
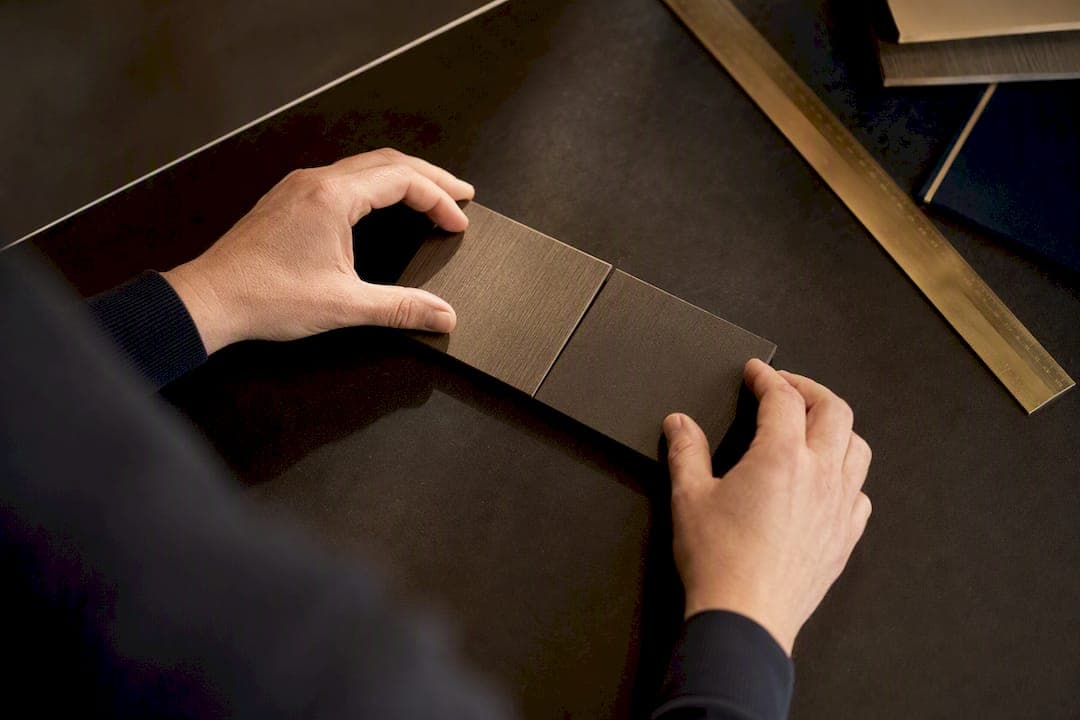
Finish sample approval is the formal process of reviewing a production-representative material sample against a specification and recording a binding decision before manufacturing or installation begins. The single immediate action, whatever your project size, is to require a labelled, physical sample linked to the spec and name one person with final sign-off authority. Everything else, from evaluation criteria to procurement handoff, exists to support that one decision.
TL;DR:
- A clear decision owner must be named for each specification section to prevent approval ambiguity and legal disputes.
- Samples should be requested with detailed specifications, labeled immediately upon arrival, photographed with reference, and tracked in a shared system for traceability.
- Structured review checklists ensure consistent evaluation of color, sheen, grain, pattern, and substrate, with viewing conditions documented for accuracy.
- Approval outcomes must be specific and binding, with full documentation of decisions, conditions, and cross-references to purchase orders and drawings.
- Producing a production-representative golden sample and retaining control samples are essential for reliable comparisons during manufacturing and after installation.
Table of Contents
- Building a finish sample approval framework
- Requesting and logging finish samples correctly
- Evaluation criteria that remove guesswork
- Approval outcomes, resubmittal rules and timelines
- Documenting approvals so they hold up to scrutiny
- Mock-ups, golden samples and first-article inspections
- Sample retention and the procurement handoff
- Practical templates for the approval record
- Why disciplined sample approval protects design intent
- Commissioning production-representative samples with Simmons Interior Supply
- Sources
- FAQ
Building a finish sample approval framework
A finish sample approval process only works when authority is unambiguous. Design teams often let approval drift between a client, an interior designer, and a site manager, and by the time a finish goes wrong, nobody can say who actually signed it off. That vagueness is what turns a colour dispute into a legal one. Treating the workflow as a control point, rather than a courtesy step, means documenting every decision and tying it back to the contract clause it satisfies, as designer-focused approval guidance recommends.
Start by naming reviewers and, separately, the single decision owner. Reviewers can include the client, the specifying designer, and a contractor's quality lead, but only one name should carry authority to close the approval. On a hospitality fit-out, that is usually the design lead named in the contract; on a bespoke furniture commission, it is often the client themselves, advised by their designer.
A workable framework needs:
- A named decision owner recorded against each specification section, not just the project as a whole
- Defined sample levels per product type (a chip for paint, a full panel for veneer, a complete unit for upholstered furniture)
- Agreement on who pays for samples beyond the first free set, particularly for bespoke or oversized panels
- A consistent naming and ID convention, so every sample and its paperwork can be traced to a spec section and a purchase order
- One storage location, physical and digital, for retained samples and their records
Skipping the naming convention is the single most common failure. Without an ID system, teams end up with three near-identical timber samples on a shelf and no reliable way to say which one the client actually approved.
Requesting and logging finish samples correctly
A sample request that omits basic detail wastes a full review cycle. Every request sent to a supplier or workshop should specify the exact substrate, the finish system (stain, lacquer, oil, plating), the part or product code, the required sample level, quantity, and a firm delivery date. Vague requests such as "send your walnut sample" invite whatever happens to be on the shelf, not what the specification calls for.
Once a sample arrives, intake needs to happen immediately, not whenever someone gets around to it. Follow this sequence:
- Label the sample physically with supplier, product code, colour or finish name, and a unique sample ID
- Photograph it against a neutral background and, separately, under the lighting conditions it will actually be viewed in
- Log the sample ID, date received, and recipient in a shared project tracker
- Record where the physical sample will live during the review period
- Cross-reference the sample ID against the relevant specification section and purchase order line
Labelling conventions matter more than they sound. B2B controls guidance for decorative materials recommends including supplier, product code, colour, finish, sample ID, and revision number on every label, with a matched retained reference held back for later comparison against bulk production.
Pro Tip: Photograph every sample next to a colour card or ruler for scale, and store the raw image files in the same folder as the approval record. A photo with no reference point is close to useless six months later when someone questions whether the delivered finish matches what was approved.
For the single source of truth, a shared project tracker (whether that is a construction management platform, a simple spreadsheet, or a dedicated document register) paired with a shared image folder covers most projects. What matters is that the sample ID appears identically in both places.
Evaluation criteria that remove guesswork
Subjective reviews are where approvals fall apart. Two people looking at the same oak veneer under different lighting will reach different conclusions, and if that disagreement surfaces after installation rather than during review, it becomes expensive fast. A structured checklist forces reviewers to assess the same things, in the same order, every time.
A finish sample review should work through:
- Colour family and match against the reference standard or previous approved batch
- Gloss level or sheen, checked at multiple angles, not just straight on
- Grain direction and consistency, particularly on veneered or laminate panels
- Pattern repeat, for anything printed, woven, or textured
- Edge treatment and how the finish behaves at joints, mitres, or seams
- Substrate match, confirming the sample is on the actual material specified, not a stand in
Viewing conditions deserve their own line in the record, not an afterthought. Note the light type (daylight, LED, tungsten), colour temperature if known, viewing distance, and which adjacent finishes or materials the sample was checked alongside. A finish that reads warm under tungsten showroom lighting can look markedly different under the cool LED strip lighting common in commercial corridors.
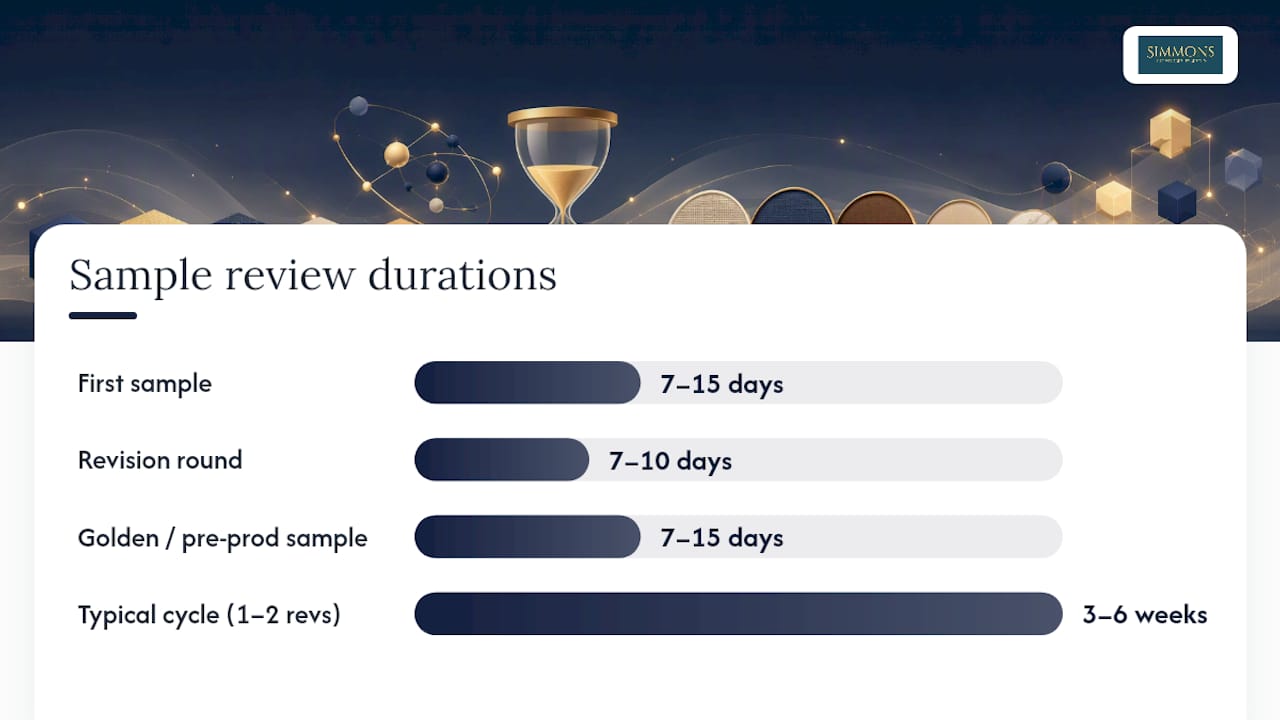
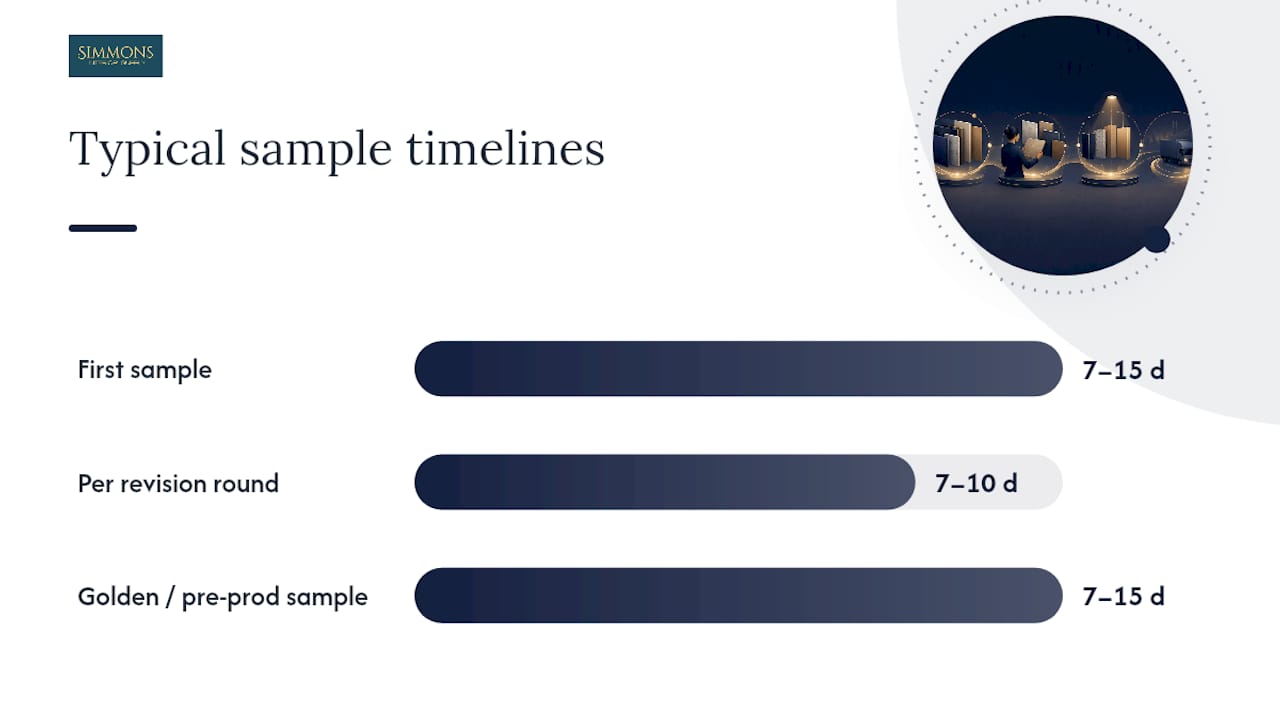
A sourcing timeline worth planning around: typical sample cycles run 7 to 15 days for a first sample, 7 to 10 days per revision round, and 7 to 15 days for a golden sample. Building that into a project programme early avoids the review becoming the bottleneck everyone blames later.
Binding notes are where most approval records fail. "Looks good" is not a note; it is an opinion with no evidential value if a dispute arises. Fire performance, VOC compliance, and durability need their own paper trail, sitting alongside the visual sign-off rather than assumed within it.
Approval outcomes, resubmittal rules and timelines
Ambiguous decision wording causes more disputes than poor finishes do. Four outcomes cover almost every review, and each carries a distinct meaning that should never be blurred in the record.
- Approved: the sample matches the specification exactly with no conditions; production or fabrication can proceed as submitted
- Approved as noted: the sample is accepted subject to specific, written conditions, which become binding once recorded
- Revise and resubmit: the sample does not meet requirements and a corrected sample is required before any further decision
- Rejected: the sample is unsuitable and the supplier must propose an alternative approach, not simply a tweaked version of the same one
Clear language such as "no exceptions taken" or "furnish as submitted" removes room for reinterpretation later, a point designer-focused submittal guidance makes explicitly in the context of liability. An "approved as noted" decision is only useful if the notes are specific enough to check against later. List the exact condition (sheen percentage, colour reference number, grain orientation) rather than a general comment, because a vague note offers no more protection than no note at all.
On timelines, budget realistically rather than optimistically. Sourcing timelines suggest 7 to 15 days for a first sample, 7 to 10 days per revision round, and 7 to 15 days for a golden or pre-production sample, meaning a full commercial sample cycle with one or two revisions can easily run 3 to 6 weeks. Bespoke furniture with hand finishing tends to sit at the longer end of that range, and building slack into the project programme now avoids a scramble later.
Documenting approvals so they hold up to scrutiny
An approval record is only as useful as its weakest field. A robust record needs the sample's unique ID, the SKU or product code, the substrate type, dated photographs, the reviewer's name, the date of review, the final decision, and any binding conditions attached to it.
That record earns its value only once it is linked outward. The approval ID should appear on the purchase order line it authorises, on any drawing revision it validates, and on the inspection plan the factory or site team works from. Without that cross-reference, an approval sits in isolation, and a factory or contractor has no reliable way of confirming which reference they are meant to be matching.
A practical documentation set includes:
- Sample ID and SKU or product code, matched exactly across all documents
- Substrate description and finish system name
- Dated, referenced photographs stored alongside the record
- Reviewer name and decision date
- Final decision status and any binding notes in full
- Cross-reference to the purchase order line and drawing revision it authorises
Retention rules need to be explicit, not assumed. Approved samples should be kept for the duration of production plus the defects' liability period, commonly a further 12 months on commercial projects, while rejected samples are worth retaining briefly too, since they document what was ruled out and why.
Pro Tip: Keep rejected samples in a separate, clearly marked box rather than discarding them immediately. When a supplier proposes something suspiciously similar to a previously rejected finish, having the physical evidence on hand settles the argument in seconds.
Mock-ups, golden samples and first-article inspections
Small samples answer colour questions. They rarely answer the question that actually causes disputes, which is how a finish behaves at scale, under real light, on the real substrate. That is the gap mock-ups and golden samples exist to close.
The hierarchy runs from small to large:
- Chip: a small cut sample, useful for an initial colour and finish shortlist only
- Panel: a larger flat sample, big enough to judge grain and sheen consistency
- Shop mock-up: a bench-built section assembled off site to check construction detail alongside finish
- Field mock-up: built in situ, under actual project lighting and alongside neighbouring materials
- Golden sample: the definitive, production-representative reference, finished with the exact system specified, retained as the standard against which every subsequent unit is measured
A full-size sample becomes essential, not optional, wherever bespoke furniture, visible joinery, or large-area tiling is involved. A drawer front finished on a six-inch chip tells you almost nothing about how a two-metre sideboard will read once light rakes across the grain, and production-representative panels are the recommended standard for exactly this reason. Our guide to choosing between a prototype and a production sample covers this distinction in more depth for custom furniture commissions.
During manufacturing, inspectors compare goods directly against the retained golden sample rather than relying on memory or the original specification document alone. That retained reference is what makes remote inspection reliable when a project team cannot physically visit a workshop or factory floor for every batch.
Sample retention and the procurement handoff
Once a sample is approved, control of it matters as much as the decision itself. Best practice, confirmed by finishing industry guidance, is to produce two matched samples at approval stage: one goes to the client or specifier as their reference copy, and one is sealed and retained as the shop or factory control sample.
Retained references need physical protection, not just a shelf. Seal the control sample in a labelled bag or box noting the sample ID, approval date, and project reference, and store it somewhere it will not fade, warp, or pick up dust that changes its apparent finish.
Procurement then needs to reference that approval explicitly, every time:
- Every purchase order and order confirmation should cite the sample ID and its approval status, not just a general product description
- Drawing revisions issued after approval should note which sample ID they were checked against
- Pre-production, in-line, and pre-shipment inspections should each compare goods physically against the retained golden sample, not a photograph of it
Skipping the pre-production check is the costliest shortcut teams take. Catching a drift in sheen or colour before a full production run starts costs a fraction of what it costs to catch it on delivered goods.
Practical templates for the approval record
An approval form only earns its place in a project if the fields are specific enough to close an argument, not just record that one happened. Every entry needs an example of acceptable wording, not just a blank box.
A workable annotated template includes these fields:
| Field | Example entry |
|---|---|
| Sample ID | FS-Rev2 |
| Product / SKU | Walnut sideboard door panel |
| Substrate | American black walnut veneer, 4mm |
| Finish system | Hardwax oil, satin |
| Reviewer | Named decision owner |
| Decision | Approved as noted |
| Binding note | Sheen accepted at specified gloss; grain to run vertical on all door faces |
| Linked PO / spec section | PO / Spec §09 |
For bespoke furniture, adapt the template by adding a full-unit photograph rather than relying on a panel image alone, since joinery details and proportion rarely translate from a small cutting. Standard commercial finishes, by contrast, can often be approved from a consistent panel size across a whole product range, provided the substrate and application method stay fixed. Our post on specifying custom finish options walks through how to word a specification so it maps cleanly onto a template like this one. For formal written requests to a client or approval body, a structured architectural request letter template offers a useful reference for professional wording and tone.
The goal of any template is repeatability. If two different reviewers, six months apart, would fill the same form out identically for the same sample, the template is doing its job.
Why disciplined sample approval protects design intent
The recurring failure isn't a bad finish. It's a good finish approved against the wrong reference, then disputed months later because nobody kept the sample that was actually signed off. A retained golden sample settles that argument in one photograph comparison, which is precisely why it earns the effort of sealing and storing one properly rather than trusting memory or an email thread.
Designers who insist on production-representative panels for bespoke commissions, rather than accepting a manufacturer's stock chip, consistently avoid the most expensive category of dispute: the one where both sides genuinely believed they'd agreed on the same thing. That's not caution for its own sake. It's the difference between a finish that reads as intended in the finished room and one that becomes a change order.
Good process doesn't slow bespoke work down. It's what makes bespoke work defensible when a client, three months after installation, asks why the sideboard doesn't quite match what they remember approving.
— Luke
Commissioning production-representative samples with Simmons Interior Supply
Getting a finish approval process right depends on having a supplier who can actually produce a reliable, production-representative sample in the first place, not just a swatch cut from stock. We build bespoke furniture to order, working directly with skilled artisans to produce prototype and production samples on the exact substrate and finish system specified, so what you approve is genuinely what arrives.

For trade clients, that means a sample process built around retention from the start: a client reference copy and a retained control piece, both traceable to the commission and ready for comparison at handover. If you're specifying a bespoke piece, such as a nest of coffee tables finished to a custom size and colour, our team works with you to confirm the finish sample before full production begins, not after. Trade accounts get direct access to commission bespoke sizing and finishes for various residential and hospitality projects. To start a commission or request a finish sample for review, get in touch through Simmons Interior Supply and tell us what you're specifying.
Sources
For deeper technical grounding, Designer Charrette's guide to the sample approval process sets out the request to record workflow and the liability implications of approval wording in detail. Woodworking Network's piece on why finish samples are about expectations, not colour explains the case for full-size, production-representative panels on bespoke work. For realistic scheduling, FBM Sourcing's breakdown of sample approval timelines covers first-sample, revision, and golden-sample durations, while Witop Décor's B2B controls guide sets out labelling and version-control conventions worth adopting as standard practice.
- Sample approval process: best practices for designers
- Finish samples aren’t about color, they’re about expectations | Woodworking Network
- Sample approval when sourcing from China: process & timelines
- Decorative material sample approval: B2B controls guide
FAQ
What Is Sample Approval?
Sample approval is the documented process of reviewing a physical material or finish sample against a specification and recording a binding decision before production or installation proceeds.
How Do You Politely Ask for Sample Approval?
Send a written request naming the substrate, finish system, part code, required sample level, quantity, and a firm delivery date, then ask the decision owner to confirm one of the standard outcomes in writing rather than a verbal "looks fine."
What Are the Types of Sample Approval?
The four standard decision outcomes are approved, approved as noted, revise and resubmit, and rejected, moving from a chip or panel sample through to a full-size mock-up or golden sample as the level of scrutiny increases.
What Are the Steps in the Approval Process?
The core sequence is request, intake, review against a structured checklist, decision, and a record that links back to the specification and purchase order, followed by retention of the approved reference for production comparison.
How Long Does Finish Sample Approval Typically Take?
A first sample usually takes 7 to 15 days, each revision round runs 7 to 10 days, and a golden or pre-production sample takes another 7 to 15 days, meaning a full cycle with revisions can span 3 to 6 weeks.